Using the Redux Plugin to capture state changes
Video Tutorial
Watch how to track state with Redux
If you don't like reading, you can follow this video tutorial showing you how to track the state of your React apps when you use Redux
If you need extra visibility when replaying your users’ sessions, getting a glimpse into the application state can be very helpful.
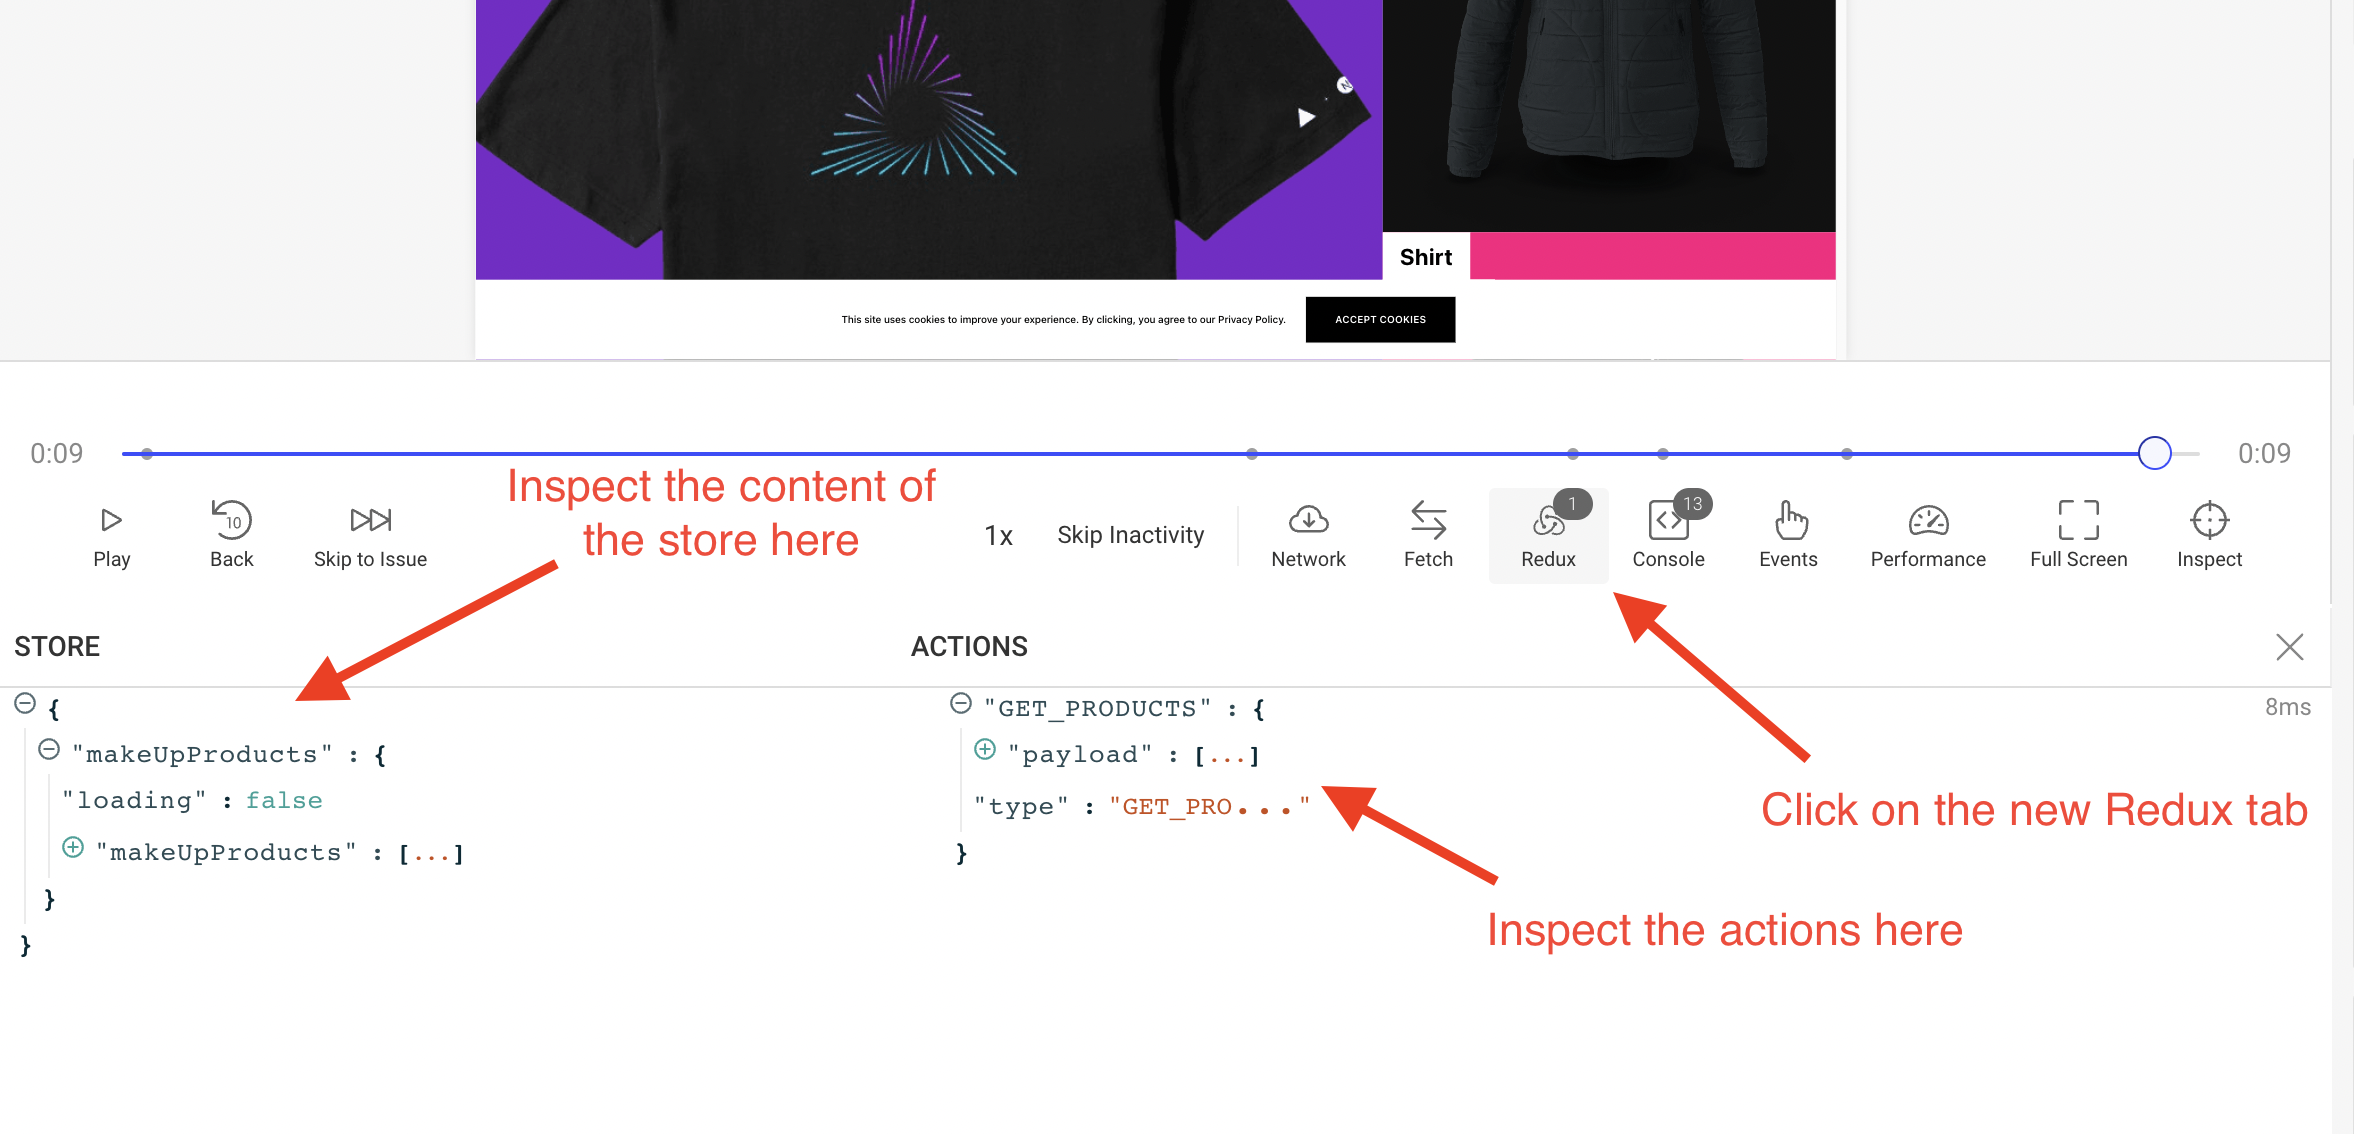
In the case of Redux, OpenReplay provides a plugin that allows you to integrate into the internal workings of the store. This plugin will let you see the state (no pun intended!) of the Redux store and the actions dispatched throughout the recorded session.
Once set up, you should be able to watch changes in the store as seen in the following screenshot:
Setting up the Redux on a Next.js project
Section titled Setting up the Redux on a Next.js projectFor this tutorial, we’ll use this repository (branch redux-store) of a generic e-commerce site built with Next.js.
In this project, we will replace a set of highlighted products with a set of new ones taken from an external API.
For that, we’ll add a function to request the products using Axios, and we’ll do it from within a Redux action.
Note: This is a complex Next.js application, so it might not follow the standard structure found inside the classic To-Do apps, but following this tutorial you should be able to keep up with the changes.
Remember: you can always clone the repo and review the code yourself.
We’ll start installing all main dependencies with:
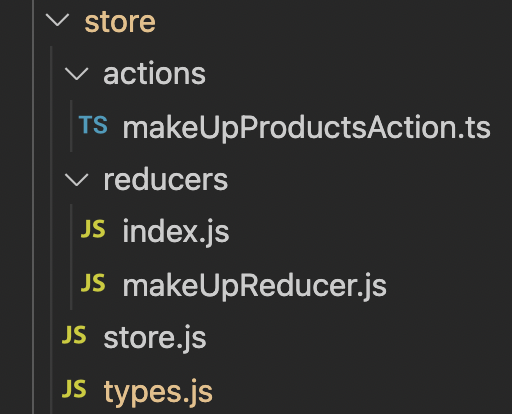
npm i next-redux-wrapper redux react-redux redux-thunk redux-devtools-extensionWith that out of the way, create a folder called store in your project’s root directory and reproduce the following structure:
The types.js file will contain the type definition for the two actions we’re going to be defining:
export const GET_PRODUCTS = 'GET_PRODUCTS'
export const PRODUCTS_ERROR = 'PRODUCTS_ERROR'
The store.js file will export a function that, WHEN called, will create a new Redux store. That is because we’ll need to add a new Redux middleware returned by the Redux plugin (more on that in a minute).
import { createStore, applyMiddleware } from 'redux'
import thunk from 'redux-thunk'
import { composeWithDevTools } from 'redux-devtools-extension'

import rootReducer from './reducers'

const initalState = {}

export default function createReduxStore(extraMiddleware = []) {
  const middleware = [thunk, ...extraMiddleware]

  const store = createStore(
    rootReducer,
    initalState,
    composeWithDevTools(applyMiddleware(...middleware))
  )
  return store
}
Our reducer file (makeUpReducer.js) will update the state with either the list of products or the error message returned when there is a problem.
import { GET_PRODUCTS, PRODUCTS_ERROR } from '../types'

const initialState = {
  makeUpProducts: [],
  loading: true,
}

export default function (state = initialState, action) {
  switch (action.type) {
    case GET_PRODUCTS:
      return {
        ...state,
        makeUpProducts: action.payload,
        loading: false,
      }
    case PRODUCTS_ERROR:
      return {
        loading: false,
        error: action.payload,
      }
    default:
      return state
  }
}
And finally, the action file will define a single function, taking care of pulling the list of products from an external API and dispatching the right action and payload:
import { GET_PRODUCTS, PRODUCTS_ERROR } from '../types'
import axios from 'axios'
import slugify from 'slugify'

export const getMakeUpProducts = () => async (dispatch: any) => {
  console.log('Getting the makeup products')

  try {
    let { data } = await axios.get(
      'https://makeup-api.herokuapp.com/api/v1/products.json?brand=maybelline&apiKey=123fff132'
    )
    const products = data

    let newProds = products.map((p: any) => {
      return {
        id: '' + p.id,
        slug: slugify(p.name),
        name: p.name,
        description: '',
        images: [{ url: p.image_link }],
        variants: [],
        price: {
          value: +p.price,
        },
        options: [],
      }
    })

    dispatch({
      type: GET_PRODUCTS,
      payload: newProds,
    })
  } catch (e) {
    dispatch({
      type: PRODUCTS_ERROR,
      payload: e,
    })
  }
}
Setting up the tracker provider
Section titled Setting up the tracker providerThis provider will allow you to configure a set of plugins, in our case, we’ll use the Redux plugin, like this (from within the _app.tsx file)
//...more imports here....
import TrackerProvider from '../context/trackerProvider'
import trackerRedux from '@openreplay/tracker-redux'

// ... more code here....

export default function MyApp({ Component, pageProps }: AppProps) {
  const Layout = (Component as any).Layout || Noop

  useEffect(() => {
    document.body.classList?.remove('loading')
  }, [])

  let plugins = [
    {
      fn: trackerRedux,
      name: 'redux',
      config: {},
    },
  ]

  return (
    <TrackerProvider config={{ plugins }}>
      <Head />
      <ManagedUIContext>
        <Layout pageProps={pageProps}>
          <Component {...pageProps} />
        </Layout>
      </ManagedUIContext>
    </TrackerProvider>
  )
}
Now, this code allows you to set up the tracker with the right plugin, but for the plugin to work, we’ll need to access the middleware returned when the plugin is called. That means we’ll have to keep track of the returned values of our plugins so they can be used elsewhere. In this case, we’ll need to use it when calling the createReduxStore function from above.
To do that, we have to extend the TrackerProvider to make sure that we keep the returned value inside the state, like this (you can review the full version of this file here):
import { createContext, useCallback } from 'react'
import Tracker from '@openreplay/tracker'
import { v4 as uuidV4 } from 'uuid'
import { useReducer } from 'react'

export const TrackerContext = createContext()
function defaultGetUserId() {
  return uuidV4()
}
function newTracker(config) {
  ///code here
}
function reducer(state, action) {
  switch (action.type) {
    case 'init': {
      if (!state.tracker) {
        console.log('Instantiaing the tracker for the first time...')
        let t = newTracker(state.config)
        let pluginsReturnedValue = {}
        if (state.config.plugins) {
          state.config.plugins.forEach((p) => {
            console.log('Using plugin...')
            pluginsReturnedValue[p.name] = t.use(p.fn(p.config)) //keep track
          })
        }
        return {
          ...state,
          pluginsReturnedValue: pluginsReturnedValue, //update the state
          tracker: t,
        }
      }
      return state
    }
    case 'start': {
      console.log('Starting tracker...')
      state.tracker.start()
      return state
    }
  }
}
export default function TrackerProvider({ children, config = {} }) {
  let [state, dispatch] = useReducer(reducer, {
    tracker: null,
    pluginsReturnedValue: {},
    config,
  })
  let value = {
    startTracking: () => dispatch({ type: 'start' }),
    initTracker: () => dispatch({ type: 'init' }),
    pluginsReturnedValues: { ...state.pluginsReturnedValue }, //inject the state
  }
  return (
    <TrackerContext.Provider value={value}>{children}</TrackerContext.Provider>
  )
}
Inside the init action, we’re also keeping track of the values returned by the use method when called with our plugins. And we’re keeping that dictionary inside the state.pluginsReturnedValue property. Which we’re making available to all children through the pluginsReturnedValues variable.
That logic allows you to use the plugin when initializing the tracker and then access and use the middleware later.
Creating the Redux store with the new middleware
Section titled Creating the Redux store with the new middlewareNow that we have the plugin working, we need to initialize the Redux store, and we need to do it after the Tracker has been initialized and before the start method is called.
For that, I’ve chosen the ManagedUI component, which is used directly in the _app.tsx file. This component is wrapped by our Tracker Provider, which means it’ll have access to the context we’re sharing.
The component looks like this:
export const ManagedUIContext: FC = ({ children }) => {
  const { initTracker, pluginsReturnedValues } = useContext(TrackerContext)
  const [store, setStore] = useState<Store>()

  useEffect(() => {
    initTracker()
  }, [])

  useEffect(() => {
    if (!pluginsReturnedValues['redux']) return
    let middleWares = pluginsReturnedValues['redux']
      ? [pluginsReturnedValues['redux']]
      : []
    setStore(createReduxStore(middleWares))
  }, [pluginsReturnedValues])

  return (
    <div>
      {store && (
        <Provider store={store}>
          <UIProvider>
            <ThemeProvider>{children}</ThemeProvider>
          </UIProvider>
        </Provider>
      )}
    </div>
  )
}
The key takeaways from this file are:
- We’re getting the
initTrackerfunction and thepluginsReturnedValuesattribute from the context. - We’re calling the first one only once, when the component is mounted (through the first
useEffect). - We’re then creating the Redux store only once the
pluginsReturnedValuesvariable has our returned value. The seconduseEffectwill be called twice, once when the page loads and then when theinitTrackermethod modifies our state variable. The second time around, we’ll create the store with the middleware stored inpluginsReturnedValues.
Starting the tracker
Section titled Starting the trackerWith the plugin setup, and the Redux store properly created, all we have to do now, is to call the start method from the tracker.
The logic for this will be added into the index.tsx file, and you can take a look at the complete source code of this file here.
The relevant part of this code that we’ll need to take a look is the following:
// imports and more logic goes here...

export default function Home({
  products,
}: InferGetStaticPropsType<typeof getStaticProps>) {

  const { startTracking } = useContext(TrackerContext)
  const dispatch = useDispatch()
  const makeUpProductsList = useSelector((state: any) => state.makeUpProducts)
  const { makeUpProducts } = makeUpProductsList

  useEffect(() => {
    async function getProds() {
      await startTracking()
      dispatch(getMakeUpProducts() as any)
    }
    getProds()
  }, [dispatch])

  return (
    <>
      <Grid variant="filled">
        {products.slice(0, 3).map((product: any, i: number) => (
          <ProductCard
            key={product.id}
            product={product}
            imgProps={{
              width: i === 0 ? 1080 : 540,
              height: i === 0 ? 1080 : 540,
              priority: true,
            }}
          />
        ))}
      </Grid>
      <Marquee variant="secondary">
        {makeUpProducts.slice(0, 3).map((product: any, i: number) => (
          <ProductCard key={product.id} product={product} variant="slim" />
        ))}
      </Marquee>
      <!-- more code here -->
    </>
  )
}
We’re only going to be using the startTracking function from the Tracker context provider and the useSelector hook from Redux to capture the list of returned products.
The useEffect hook will trigger the call to startTracking and the retrieval of the new make-up products list by dispatching the getMakeUpProducts function call.
Have questions?
Section titled Have questions?You can check out this repository for the complete source code of a working Next.js-based application with a Redux store.
If you have any issues setting up the Redux plugin, please contact us on our Slack community and ask our devs directly!