GraphQL 플러그인 사용하기
애플리케이션에서 API용 쿼리 언어로 GraphQL을 사용하고 있다면, GraphQL 플러그인으로 GraphQL 서버에 대해 수행된 뮤테이션과 쿼리를 모두 추적할 수 있습니다.
이 튜토리얼에서는 Apollo Boost 클라이언트를 사용하지만, 사용 중인 클라이언트에서 미들웨어를 설정할 수 있다면 어떤 클라이언트든 코드에서 이 플러그인을 사용할 수 있습니다.
따라 해 보고 싶다면 GraphQL 서버와 클라이언트 앱이 모두 들어 있는 이 저장소를 확인해 보세요.
먼저 트래커 설정하기
Section titled 먼저 트래커 설정하기GraphQL 플러그인을 설치하기 전에 먼저 트래커가 설치되어 있어야 합니다. 이미 설치 방법을 알고 있다면 다음 섹션으로 건너뛰고, 그렇지 않다면 계속 읽어 주세요.
이 코드는 init과 start라는 두 함수를 내보내는 별도의 모듈에 저장합니다.
첫 번째 함수는 트래커를 인스턴스화하고 모든 플러그인을 설정하며, 두 번째 함수는 start 메서드만 호출합니다.
import { tracker } from '@openreplay/tracker';

export function init({plugins}) {

    tracker.configure({
        projectKey: process.env.OPENREPLAY_PROJECT_KEY
    });


    let pluginResults = {}
    if(plugins) {
        Object.keys(plugins).forEach( pk => {
            pluginResults[pk] = tracker.use(plugins[pk]())
        })
    }
    return pluginResults
}

export function start() {
    return tracker.start()
}
init 함수에서 눈여겨볼 점은 모든 플러그인의 반환값으로 이루어진 객체를 반환한다는 것입니다. 일부 플러그인은 나중에 사용해야 하는 함수를 반환합니다(GraphQL 플러그인이 그런 경우입니다). 이 방식을 사용하면 모든 플러그인과 함께 트래커를 한 번에 초기화한 뒤, 반환된 값을 필요할 때마다 사용할 수 있습니다.
플러그인 사용하기
Section titled 플러그인 사용하기npm i @openreplay/tracker-graphql로 플러그인을 설치한 후, 다음 코드를 사용해 방금 정의한 init 함수를 호출합니다.
import trackerGraphQL from '@openreplay/tracker-graphql';
import {init} from './tracker/index'

const {graphqlTracker} = init({
  plugins: {
    graphqlTracker: trackerGraphQL
  }
})
여기서 사용한 graphqlTracker 키는 원하는 이름으로 바꿔도 됩니다. plugins 섹션에서 사용한 키가 init 함수의 결과에서 구조 분해 할당으로 꺼내는 키와 같기만 하면 문제없습니다.
Apollo 클라이언트로 플러그인 설정하기
Section titled Apollo 클라이언트로 플러그인 설정하기이 튜토리얼에서는 Apollo Boost 라이브러리를 사용합니다. 이 라이브러리를 사용하면 “링크(link)”라는 개념을 통해 각 요청의 데이터 흐름을 수정할 수 있습니다.
이 링크는 미들웨어 함수와 비슷해서, 요청의 데이터 흐름을 가로채 이 경우에는 그 내용을 기록하는 데 사용할 수 있습니다.
다음 코드는 ApolloLink 함수를 사용해 새 링크를 만듭니다. 이 링크는 작업의 데이터와 결과를 캡처하고, 위의 init 호출에서 반환된 graphqlTracker 함수를 호출합니다.
const trackerApolloLink = new ApolloLink((operation, forward) => {

  const operationDefinition = operation.query.definitions[0];
  let {operationName, variables} = operation
  const {kind, operation: op} = operationDefinition
  const opKind = kind === 'OperationDefinition' ? op : 'unknown?'

  let results = forward(operation).map((result) => {
    return graphqlTracker(opKind, operationName, variables, result);
  });
  if(results.length === 0) { //if there are no results, then we've not tracked anything so far...
    graphqlTracker(opKind, operationName, variables, {});
  }
  return results
});
이제 준비가 끝났으니, 새로 만든 링크를 다음과 같이 사용할 수 있습니다.
import {ApolloClient,  HttpLink } from 'apollo-boost';
import { ApolloProvider } from '@apollo/react-hooks';
import { InMemoryCache } from 'apollo-cache-inmemory';
import { ApolloLink, from } from '@apollo/client';

const link = from([
  trackerApolloLink,
  new HttpLink({uri: () => 'http://localhost:4000/graphql'}),
]);

const client = new ApolloClient({
  link,
  cache: new InMemoryCache()
});

ReactDOM.render(<ApolloProvider client={client}>
  <App />
</ApolloProvider>, document.getElementById('root'));
위 코드는 Apollo 문서에서 가져온 것입니다. 이 시점에서 트래커와 플러그인은 이미 설정되었으므로 더 신경 쓸 부분은 없습니다.
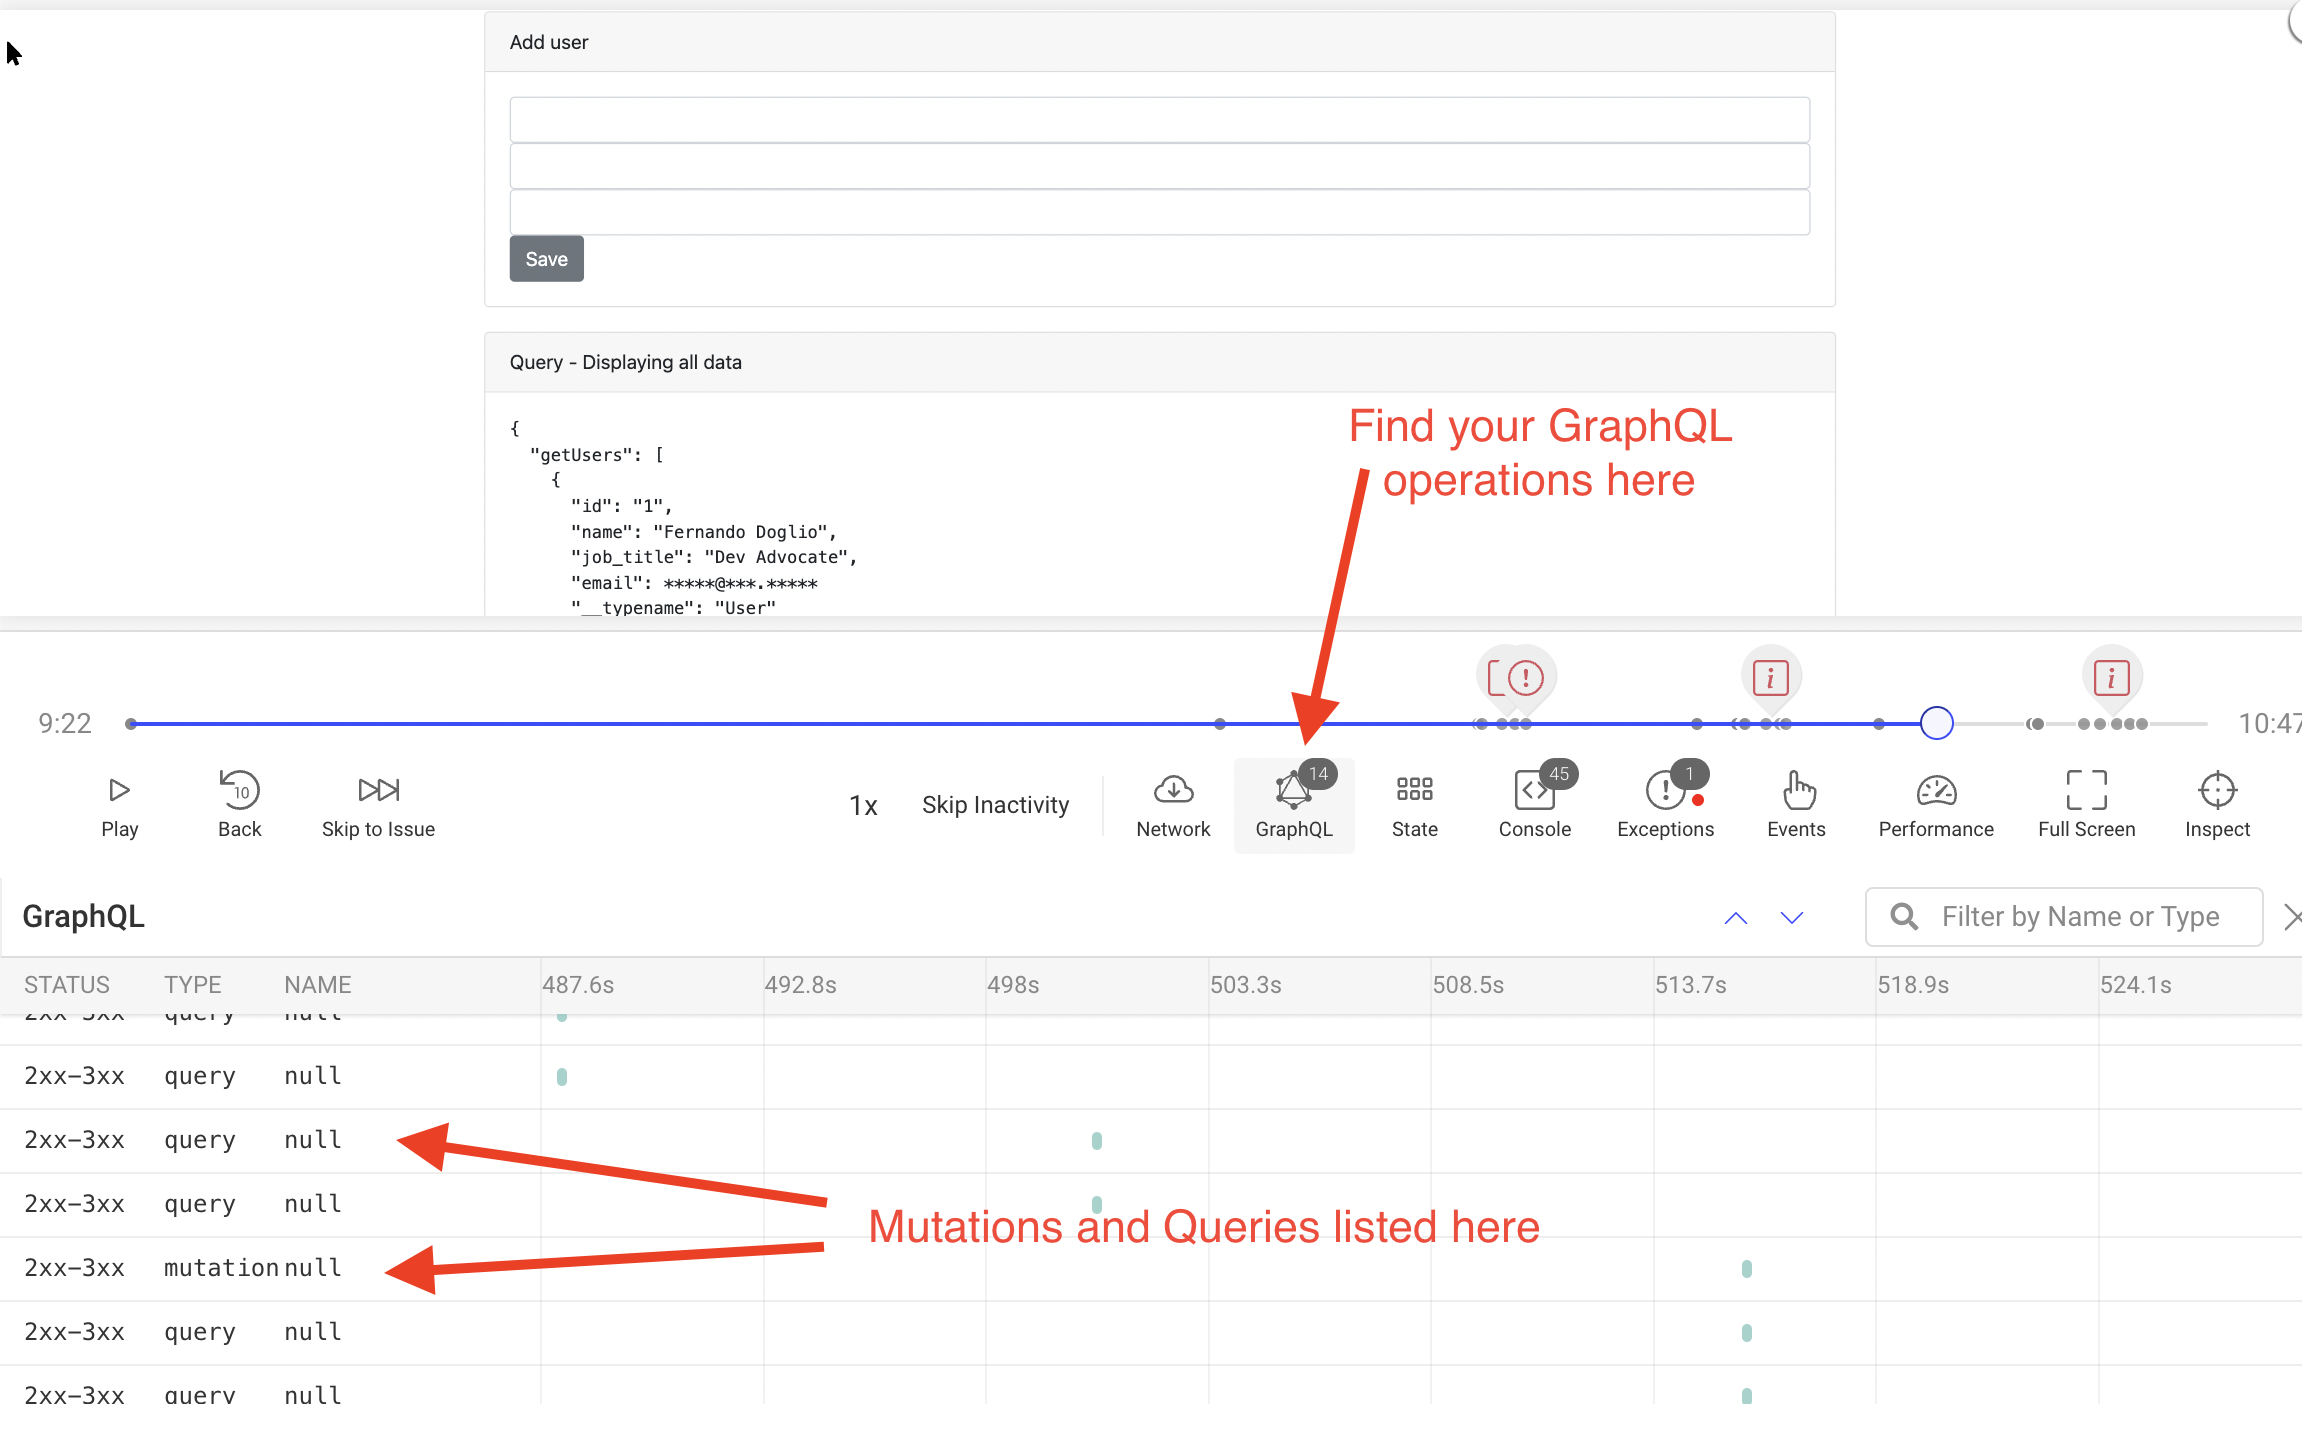
설정이 끝나면 리플레이에 모든 GraphQL 작업을 나열하는 새 섹션이 표시됩니다.
다만 트래커가 자동으로 정제하는 민감한 정보(예: 이메일 주소)는 플러그인에서는 정제되지 않습니다. 그래서 아래와 같이 DOM에는 정제된 데이터가 표시되지만, 작업 상세 정보에는 실제 데이터가 그대로 표시되는 상황이 생깁니다.
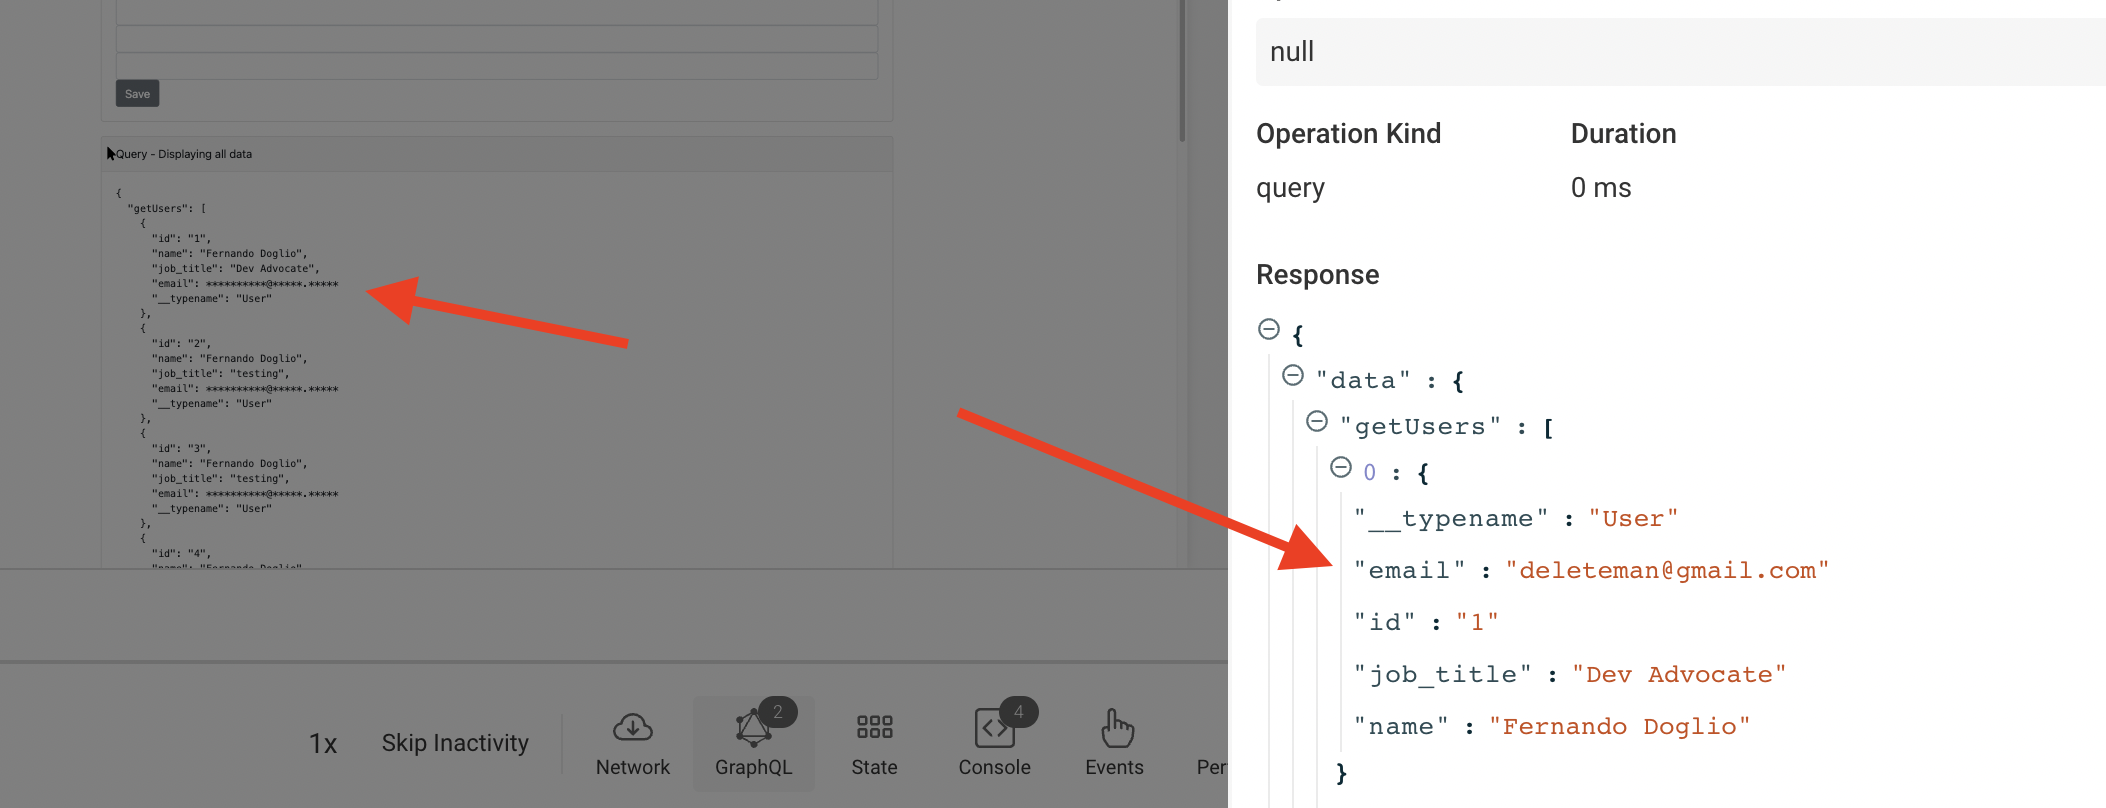
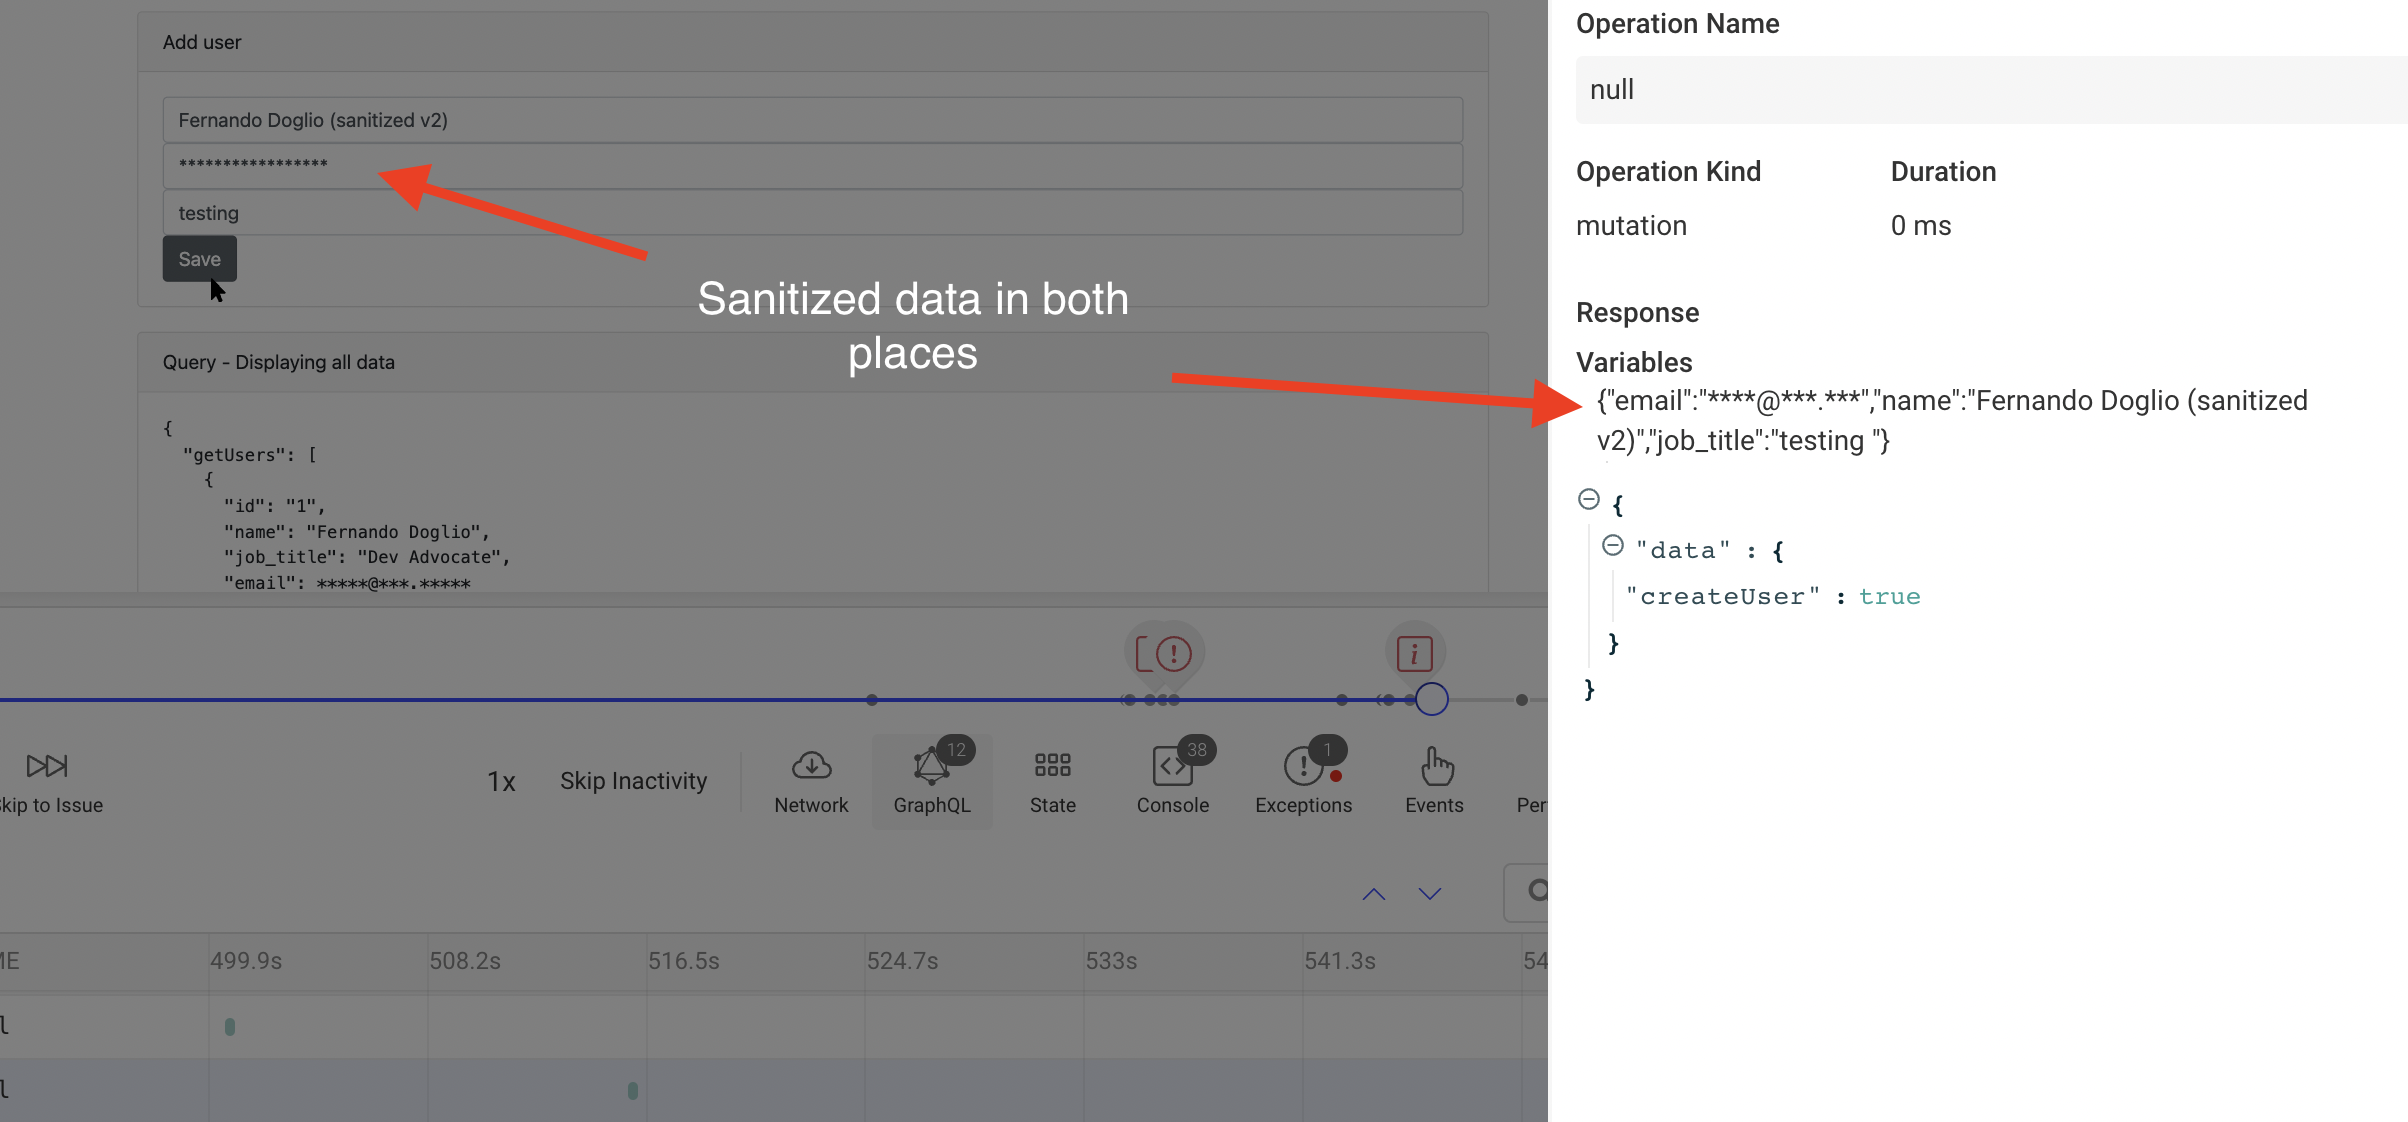
플러그인 자체는 정제 기능을 제공하지 않지만, 개인 정보와 비공개 정보를 리플레이에서 숨기는 코드를 추가하여 사용자의 개인정보를 보호할 수 있습니다.
기록되는 데이터 정제하기
Section titled 기록되는 데이터 정제하기trackerApolloLink 객체를 만드는 코드 예제를 보면, 하는 일은 트래커에 정보를 저장하는 트래커 함수를 호출하는 것뿐입니다.
데이터를 변경하지 않으면 모든 데이터가 그대로 저장됩니다. 따라서 작업 자체는 그대로 유지하면서 리플레이의 데이터를 정제하려면, 트래커를 호출하기 전에 핵심 변수들을 복제해야 합니다. 즉, 작업의 변수와 결과를 복제하면 충분합니다.
다음은 ApolloLink를 만들면서 리플레이 데이터 안의 정보를 비공개로 유지하는 코드 스니펫입니다.
/**
 * Sanitize the result from a GraphQL operation
 * @returns Returns the result object but with the sanitized fields changed.
 */
function sanitizeResult(res) {
  //deep clonning needs to happen to make sure this only affects the new object and not
  //the original object.
  let sanitized = JSON.parse(JSON.stringify(res))

  let ops = Object.keys(sanitized.data)
  ops.forEach( o => {
    if(Array.isArray(sanitized.data[o])) { //mutations don't really return arrays
      sanitized.data[o] = sanitized.data[o].map( sanitizeData )
    }
  })
  return sanitized
}

// We only want to hide the content of othe "email" field for now.
function sanitizeData(vars) {
  let newVars = {...vars}
  if(newVars.email) {
    newVars.email = "****@***.***"
  }
  return newVars
}

const trackerApolloLink = new ApolloLink((operation, forward) => {

  const operationDefinition = operation.query.definitions[0];
  let {operationName, variables} = operation
  const {kind, operation: op} = operationDefinition
  const opKind = kind === 'OperationDefinition' ? op : 'unknown?'

  let trackedVariables = sanitizeData({...variables})
  let results = forward(operation).map((result) => {
    let trackeresults = sanitizeResult(result)
    graphqlTracker(opKind, operationName, trackedVariables, trackeresults);
    return result //we have to return the original "result" object here, not the sanitized one
  });
  if(results.length === 0) { //if there are no results, then we've not tracked anything so far...
    graphqlTracker(opKind, operationName, trackedVariables, {});
  }
  return results
});
이 코드의 핵심은 다음과 같습니다.
- 객체에서
email을 정제하는 함수와 GraphQL 작업의 결과를 정제하는 함수, 이렇게 두 가지 함수를 추가했습니다. - (링크 함수의)
map콜백 안에서는 이제 graphqlTracker의 출력을 반환하지 않습니다. 해당 함수는 전달받은 결과값을 그대로 반환하기 때문입니다. 그런데 그 결과는 클라이언트 앱에 반환되므로, 결과를 정제하면 사용자는 정제된 버전의 데이터를 보게 됩니다. 대신 결과를 복제하여 추적되는 쪽만 수정하고, 원본은 그대로 반환해야 합니다. sanitizeResult함수는 객체를 깊은 복사(deep clone)합니다. 그렇지 않고 수정하면 결과 자체가 바뀌기 때문입니다.
질문이 있으신가요?
Section titled 질문이 있으신가요?트래커를 적용한 GraphQL 기반 애플리케이션의 전체 소스 코드는 이 저장소에서 확인할 수 있습니다.
GraphQL 프로젝트에서 트래커를 설정하는 중 문제가 생기면 Slack 커뮤니티로 문의해 주세요. 개발자에게 직접 질문할 수 있습니다!